Javelin Stamp Developers Guide...

LK/ELK/VK/PK/OK/MX/GLK/EGLK/GVK/GLT Series

Moderators: Henry, Mods

Post Reply
Henry
OMNIPRESENT
OMNIPRESENT
Posts: 3002
Joined: Tue Aug 14, 2001 6:00 pm
Contact:

Javelin Stamp Developers Guide...

Post by Henry »

This thread is for developers of the Javelin Stamp from Parallax. Below is some examples and source code. If you have anything you belive would be worth sharing let us know.

Starter Kit
Image

The Javelin is a 24-pin DIP module programmed in a subset of the Sun Microsystems Java language. The Java programming language is not the only thing that makes the Javelin Stamp uniquely different from BASIC Stamps: 32 k bytes of RAM/program space (leftover space can be used for variables, arrays, and serial buffers; 32 k bytes of non-volatile EEPROM; buffered serial communication in the background; up to seven UART objects that can communicated independently of each other and the main program; pulse width modulation in the background; 8000 instructions/second execution speed (not including background processes which run independently of foreground tasks).

Just the Stamp...
Image
Last edited by Henry on Wed Jan 26, 2011 1:41 pm, edited 7 times in total.
Henry J.
President
Matrix Orbital

Johnny1
Matrix Orbital
Matrix Orbital
Posts: 23
Joined: Tue Dec 10, 2002 1:23 pm
Contact:

Introduction and basics...

Post by Johnny1 »

Before you start...
You need to either set your LCD for TTL levels or add a RS232 chip to you circuit. For setting the LCD to TTL levels, please consult the manual for your display.

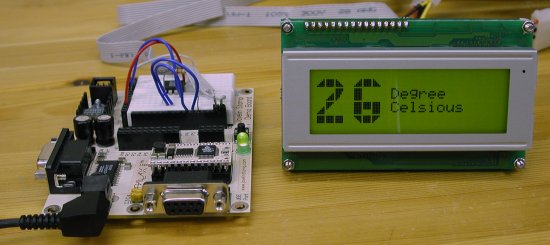
Connecting the LCD to the Javelin Stamp (Hardware)...
We used one of our serial cables, cut the end off and then soldered connectors to pin #2, #3 and #5.

Pin #2 is connected to P0
Pin #3 is connected to P1
Pin #5 is connectod to Vss, which is ground

Code Examples

Connecting the LCD to the Javelin Stamp (Software)...

Before you can communicate with the LCD you need to create a Virtual UART Peripheral to communicate with the LCD.

Code: Select all

// Uart.dirTransmit -> Uart will be used to transmit data only.
// CPU.pin0 -> Pin used to transmit data
// Uart.dontInvert -> data is not inverted
// Uart.speed19200 -> serial data transfer speed (baud rate)
// Uart.stop1 -> Number of stop bits used is 1

static Uart txUart = new Uart(Uart.dirTransmit, CPU.pin0, Uart.dontInvert, Uart.speed19200, Uart.stop1 );
Sending text to the screen:

Now that you have a connection to the LCD sending text is very easy. Just send each byte (character) at a time like this...

Code: Select all

txUart.sendByte(0x43);     // letter 'C' ASCII code
txUart.sendByte(0x6F);     // letter 'o' ASCII code
txUart.sendByte(0x6C);     // letter 'l' ASCII code
OR even better send the whole string at once...

Code: Select all

txUart.sendString("Cool");     // Send string "Cool"
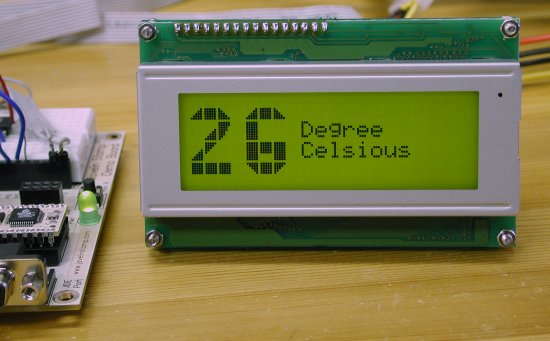
Your LCD should display the word "Cool" after running this code.

Sending a Command to the display:

Sending a command to the display is as easy as sending characters to the display except that you need to send it the command prefix '0xFE' first and then the command and any arguments if required. Note that you cannot use sendString to send a command to the LCD. You need to send each character individually.

For example to clear the screen...

Code: Select all

txUart.sendByte(0xFE);     // Command Prefix in HEX
txUart.sendByte(0x58);     // Clear command
In this example the command to clear the screen is sent to the display. Every command requires a "Command Prefix". In Matrix Orbital displays, that's Hex: FE Decimal: 254 ASCII: 254, you can send these bytes in any format you want, as long as you do it properly. In our example we sent them as HEX, if you prefer DECIMAL then don't include 0x.
i.e.
txUart.sendByte(254); // Command Prefix in DECIMAL


Setting the Backlight to go off in 2 minute:

Code: Select all

txUart.sendByte(0xFE);     // Command Prefix
txUart.sendByte(0x42);     // Backlight ON command
txUart.sendByte(0x02);     // Stay ON for 2 minutes only
To permanently turn the backlight on, you would send 0 as the third byte. When the display recieves the command, it will know how many more bytes of information it should get. In the backlight on case, the display knows to expect one more byte of information.
Last edited by Johnny1 on Mon Dec 16, 2002 5:36 pm, edited 7 times in total.

Johnny1
Matrix Orbital
Matrix Orbital
Posts: 23
Joined: Tue Dec 10, 2002 1:23 pm
Contact:

Large Digits...

Post by Johnny1 »

Our Alphanumeric displays have the ability to display large digits. This is usefull if you want to see the temperature in large easy to read letters.

Introduction:

Large digits is a combination of the 8 custom characters a LCD/VFD has. These 8 custom characters are user defined and can be used how ever the user sees fit. You will have to note, that you cannot use Large Digits, Bar Graps or user defined Custom Characters at the same time. It has to be one or the other.

Countdown Example:

Code: Select all

    // Countdown from 9 to 0
    txUart.sendByte(0xFE);    // Command prefix
    txUart.sendByte(0x6E);    // Initialize large digits
    for(i = 9; i >= 0; i--)   // Iterate from 9 to 0
    {
      txUart.sendByte(0xFE);  // Command prefix
      txUart.sendByte(0x23);  // Place large digits command
      txUart.sendByte(19);    // Column where to start placing digit
      txUart.sendByte(i);     // Digit to display (From 9 to 0)
      CPU.delay(30000);       // Pause for 3 seconds to allow viewing
    }
In this code, the LCD will display 10 large digits, starting with 9 and going to 0. You can expand on this by creating 2+ more numbers at the same time. This code is usefull for the digital thermometer we will be building next.
Last edited by Johnny1 on Mon Dec 16, 2002 5:42 pm, edited 1 time in total.
Johnny Patino
Software Developer
Matrix Orbital

Johnny1
Matrix Orbital
Matrix Orbital
Posts: 23
Joined: Tue Dec 10, 2002 1:23 pm
Contact:

Digital Thermometer Program

Post by Johnny1 »

You need:

1x Matrix Orbital LCD/VFD
1x Javelin Starter Kit
1x Serial Cable

Code: Select all

/***********************************************************
 *  MATRIX ORBITAL - DISPLAY TEMPERATURE SAMPLE CODE
 *  December 16, 2002  
 *  This program demonstrates how to communicate with a DS1620 chip
 *  to check for the room temperature in degree Celsious.
 *  Once the program has the temperature, it proceeds to display it on a
 *  CD using large digits.
 *  The program iterates endlessly checking and displaying the
 *  temperature every minute.
 *  LIMITATIONS:
 *  1. This program assumes that the temperature will never be below 0
 *      or above 99 degrees Celsious.
 *  2. This program also assumes a minimum LCD size of 4 rows by 20
 *      columns.
 ***********************************************************/

// Stamp core basic classes
import stamp.core.*;
// This class encapsulates the basic capabilities of the Dallas DS1620 3-wire
// temperature sensor
import stamp.peripheral.sensor.temperature.DS1620;

public class DisplayTemp {

  // A virtual peripheral UART.
  // Each instance of this class provides asynchronous serial communication
  // ina single direction. For full-duplex communications create two Uart
  // objects, one for each direction.
  // Uart.dirTransmit -> Uart will be used to transmit data only.
  // CPU.pin0 -> Pin used to transmit data
  // Uart.dontInvert -> data is not inverted
  // Uart.speed19200 -> serial data transfer speed (baud rate)
  // Uart.stop1 -> Number of stop bits used is 1
  static Uart txUart = new Uart(Uart.dirTransmit, CPU.pin0, Uart.dontInvert,
                                           Uart.speed19200, Uart.stop1 );

  // main function drives the program
  public static void main() {

    // Creates DS1620 temperature sensor object
    // CPU.pin4: Data pin
    // CPU.pin5: Clock pin
    // CPU.pin6: RST
    DS1620 indoor = new DS1620(CPU.pin4,CPU.pin5,CPU.pin6);
    int iTemp = 0;   // Holds temperature in Celsious
    int iTenths = 0; // Most significant digit of temperature (Tenths)
    int iOnes = 0;   // Least significant digit of temperature (Ones)

    // General display settings
    // Clear screen
    txUart.sendByte(0xFE); // Command Prefix
    txUart.sendByte(0x58); // Clear command
    // Underline Off
    txUart.sendByte(0xFE); // Command Prefix
    txUart.sendByte(0x4B); // Underline off command
    // Blinking Off
    txUart.sendByte(0xFE); // Command Prefix
    txUart.sendByte(0x54); // Blinking off command

    // Display 'Degree Celsius' beside number of degrees
    // Position cursor
    txUart.sendByte(0xFE); // Command Prefix
    txUart.sendByte(0x47); // Move cursor command
    txUart.sendByte(0x09); // column position
    txUart.sendByte(0x02); // row position
    // Send text to the above cursor position
    txUart.sendString("Degrees");  //Sends the word "Degrees" to the LCD 
    // Next Line - Move cursor to the next line
    txUart.sendByte(0xFE); // Command Prefix
    txUart.sendByte(0x47); // Move cursor command
    txUart.sendByte(0x09); // column position
    txUart.sendByte(0x03); // row position
    // Send text to the above position
    txUart.sendString("Celsious"); // Sends the word "Celsious" to the LCD
    // Large Digits On
    txUart.sendByte(0xFE); // Command Prefix
    txUart.sendByte(0x6E); // Large digits on command
    // Infinite Loop that checks current temperature and displays it
    while(true)
    {
      // Get Temperature in Celsious
      iTemp = indoor.getTempC();  // Requests temperature from DS1620
      // Get tenths - the most significant digit to display first
      iTenths = (int)iTemp / 10;
      // Get ones - the least significant digit to display second
      iOnes = iTemp - iTenths * 10;
      // Send temperature to lcd - first tenths then ones
      // Send tenths
      txUart.sendByte(0xFE); // Command Prefix
      txUart.sendByte(0x23); // Large digit command
      txUart.sendByte(0x01); // Column location - Large digits take-up 3 cols
      txUart.sendByte(iTenths); // Digit - Takes up columns 1, 2, and 3
      // Send ones - leave column 4 blank
      txUart.sendByte(0xFE); // Command Prefix
      txUart.sendByte(0x23); // Large digit command
      txUart.sendByte(0x05); // Column location - 1,2,3 taken-up by tenths
      txUart.sendByte(iOnes); // Digit - Takes up columns 5, 6, an 7
      // Pause for a minute - maximum delay is 32 seconds
      CPU.delay(32000); // Pauses for 32 seconds
      CPU.delay(32000); // Pauses for 32 seconds
    }
  }
}
Johnny Patino
Software Developer
Matrix Orbital

Henry
OMNIPRESENT
OMNIPRESENT
Posts: 3002
Joined: Tue Aug 14, 2001 6:00 pm
Contact:

Some pictures...

Post by Henry »

Couple of pictures of it in action...

Image

Image
Henry J.
President
Matrix Orbital

Pheonix
LCD Guru
Posts: 140
Joined: Tue Nov 27, 2001 4:00 pm
Contact:

Post by Pheonix »

Well done henry...I'm sure its got lots of useful uses (I just dunno any right now!)

GLK12232-WBL looks sweet, specially with the graph!

Henry
OMNIPRESENT
OMNIPRESENT
Posts: 3002
Joined: Tue Aug 14, 2001 6:00 pm
Contact:

Displaying Custom Characters

Post by Henry »

Our Alphanumeric displays have the ability to custom characters. This is usefull if you want to use characters not available in the displays character map.

Introduction:

All of Matrix Orbital Alphanumeric LCD and VFDs have 8 custom character locations. The custom characters are predefined and then called with in the program by the decimal or hex value. In this example we use hex therefore calling our digits will be by 0x00, 0x01, 0x02, 0x03, 0x04, 0x05, 0x06 and 0x07. Custom characters are used to generate the bargraphs and large digits, therefore you cannot have custom characters and bargraps (or large digits) at the same time.

Display a Custom Character:

Code: Select all


  public static void main()
  {
    txUart.sendByte(0xFE);  //command prefix
    txUart.sendByte('N');   //custom characer command
    txUart.sendByte(0x00);  //custom character value 0-7
    txUart.sendByte(12);    //8 bytes to create 
    txUart.sendByte(18);    //the custom caharacter
    txUart.sendByte(18);
    txUart.sendByte(12);
    txUart.sendByte(0);
    txUart.sendByte(0);
    txUart.sendByte(0);
    txUart.sendByte(0);

    txUart.sendByte(0x00);   //display custom character 0

   }


In this code, the LCD will display a degree symbol.
Last edited by Henry on Sat May 03, 2003 7:37 am, edited 1 time in total.
Henry J.
President
Matrix Orbital

Henry
OMNIPRESENT
OMNIPRESENT
Posts: 3002
Joined: Tue Aug 14, 2001 6:00 pm
Contact:

Creating an Animated Character

Post by Henry »

Our Alphanumeric displays have the ability to custom characters, but sometimes you will want to be able to create animated ones. This can be done by re-using custom characters.

Introduction:

All of Matrix Orbital Alphanumeric LCD and VFDs have 8 custom character locations. The custom characters are predefined and then called with in the program by the decimal or hex value. In this example we use hex therefore calling our digits will be by 0x00, 0x01, 0x02, 0x03, 0x04, 0x05, 0x06 and 0x07. Custom characters are used to generate the bargraphs and large digits, therefore you cannot have custom characters and bargraps (or large digits) at the same time. You can redefine custom characters on the fly and even when they are displayed. If you have a custom character displays, you can change they way the all look by resending the information to it!

Displaying Animated Custom Charactersr:

We have two examples of code here, they both will do the exact same thing, just in two different ways.

EXAMPLE I

This example uses two custom characters and will display one and then the other to create motion.

Code: Select all


  public class CustomChar1
{
  static Uart txUart = new Uart(Uart.dirTransmit, CPU.pin0, Uart.dontInvert, Uart.speed19200, Uart.stop1 );

  public static void main()
  {
    txUart.sendByte(0xFE);
    txUart.sendByte('X');       //clear screen

    txUart.sendByte(0xFE);
    txUart.sendByte('P');       //set contrast
    txUart.sendByte(0x70);

    txUart.sendByte(0xFE);    //command prefix
    txUart.sendByte('N');     //custom characer command
    txUart.sendByte(0x00);    //custom character value 0-7
    txUart.sendByte(14);      //8 bytes to create the custom caharacter
    txUart.sendByte(14);
    txUart.sendByte(4);
    txUart.sendByte(31);
    txUart.sendByte(4);
    txUart.sendByte(4);
    txUart.sendByte(10);
    txUart.sendByte(17);

    txUart.sendByte(0xFE);    //command prefix
    txUart.sendByte('N');     //custom characer command
    txUart.sendByte(0x01);    //custom character value 0-7
    txUart.sendByte(14);      //8 bytes to create the custom caharacter
    txUart.sendByte(14);
    txUart.sendByte(21);
    txUart.sendByte(14);
    txUart.sendByte(4);
    txUart.sendByte(4);
    txUart.sendByte(10);
    txUart.sendByte(10);

    while (true)
    {
      txUart.sendByte(0xFE);    //command prefix
      txUart.sendByte('H');     //send cursor home
      txUart.sendByte(0x00);    //display custom character 0x00
      CPU.delay(5000);          //pause
      txUart.sendByte(0xFE);    //command prefix
      txUart.sendByte('H');     //send cursor home
      txUart.sendByte(0x01);    //display custom character 0x01
      CPU.delay(5000);          //pause
    }
   }
EXAMPLE II

This example uses only one custom character, but redefines the data of it every single time.

Code: Select all

public class CustomChar2
{
  static Uart txUart = new Uart(Uart.dirTransmit, CPU.pin0, Uart.dontInvert, Uart.speed19200, Uart.stop1 );

  public static void main()
  {

    txUart.sendByte(0xFE);
    txUart.sendByte('X');       //clear screen
    txUart.sendByte(0x00);     //display custom character 0

    while (true)
    {
      CustomChar2.Char1();
      CPU.delay(5000);
      CustomChar2.Char2();
      CPU.delay(5000);
    }
   }

  public static void Char1()
    {
    txUart.sendByte(0xFE);    //command prefix
    txUart.sendByte('N');     //custom characer command
    txUart.sendByte(0x00);    //custom character value 0-7
    txUart.sendByte(14);      //8 bytes to create the custom caharacter
    txUart.sendByte(14);
    txUart.sendByte(4);
    txUart.sendByte(31);
    txUart.sendByte(4);
    txUart.sendByte(4);
    txUart.sendByte(10);
    txUart.sendByte(17);
    }

  public static void Char2()
    {
    txUart.sendByte(0xFE);    //command prefix
    txUart.sendByte('N');     //custom characer command
    txUart.sendByte(0x00);    //custom character value 0-7
    txUart.sendByte(14);      //8 bytes to create the custom caharacter
    txUart.sendByte(14);
    txUart.sendByte(21);
    txUart.sendByte(14);
    txUart.sendByte(4);
    txUart.sendByte(4);
    txUart.sendByte(10);
    txUart.sendByte(10);
    }
}
Image

small movie...
http://www.matrixorbital.com/forum_imgs ... 010014.mov
Henry J.
President
Matrix Orbital

Post Reply